VLSM Setup Docs
- Installing InteLIS on Ubuntu 22.04 or above (only Ubuntu LTS)
- Updating InteLIS on Ubuntu 22.04 or above (only Ubuntu LTS)
- Installing VLSM on a Windows Machine
- Updating VLSM on a Windows Machine
- Migrating From one Ubuntu machine to another
- Fix Illegal/Mismatched Collation Issue
- Backing up to Google Drive with Rclone on Ubuntu
- Setting up Interfacing Tool on a client Ubuntu Machine
- Permission Denied Issue
- Backing up LIS or STS to a remote Backup server
Installing InteLIS on Ubuntu 22.04 or above (only Ubuntu LTS)
Please note this will work on Ubuntu 22.04 or above (ONLY LTS)
Start the terminal and run these commands ONE BY ONE
cd ~;

sudo wget -O setup.sh https://github.com/deforay/intelis/raw/master/scripts/setup.sh

sudo chmod +x setup.sh;

sudo ./setup.sh;

sudo rm setup.sh;

exit
Enter the mysql password and STS URL correctly when prompted
InteLIS Setup
- During setup enter the correct STS URL and select the correct Testing Lab
- Once the setup is completed, you can open InteLIS on the browser by visiting http://intelis/
- You will be asked to complete the LIS setup and to register an admin user
- After successful setup and registration, log in as admin at http://intelis/
Updating InteLIS on Ubuntu 22.04 or above (only Ubuntu LTS)
Please note this will work on Ubuntu 22.04 or above (ONLY LTS)
Start the terminal and run these commands ONE BY ONE
sudo wget -O /usr/local/bin/intelis-update https://github.com/deforay/intelis/raw/master/scripts/upgrade.sh;

sudo chmod +x /usr/local/bin/intelis-update;

sudo intelis-update
Enter the mysql password and STS URL correctly when prompted
Installing VLSM on a Windows Machine
0. Download
- Notepad++ or MicroSoft VS Code
- WampServer from https://www.wampserver.com/en/. Check if Windows is 32 bit or 64 bit. Download WampServer 32 or 64 bit version based on the windows machine
- VC Packages
1. Installing WAMP Server
- Ensure Windows system is updated. This is important to ensure there is no issue on WampServer later on.
- Install VC Packages that we downloaded already - for 64 bit you need to install all, for 32 bit only install 32 bit ones
- Reboot machine after installing
- Now run WampServer and ensure it is showing green icon
2. Configuring PHP and MySQL
2.1 PHP Setup
-
Download cacert.pem from https://curl.se/docs/caextract.html. Place it in
C:\wamp\orC:\wamp64\path. This is needed to allow the application to communicate with VLSTS -
Change PHP version to 8.2.13. To do this, click on WampServer -> PHP -> version -> 8.2.13
-
Next we will change PHP settings to make them more optimum for VLSM. To do this, click on WampServer -> PHP -> php.ini
- When the file opens search for
memory_limit. Change 128mb to 2G (or more if there is more RAM available on the computer) - Now search for
post_max_size. Change 8M to 500M - Now search for
upload_max_filesize. Change 2M to 500M - Find
;openssl.cafile=and change it toopenssl.cafile='C:\wamp\cacert.pem'oropenssl.cafile='C:\wamp64\cacert.pem' - Find
;curl.cainfo =and change it tocurl.cainfo ='C:\wamp\cacert.pem'orcurl.cainfo ='C:\wamp64\cacert.pem' - Now search for
error_reporting. Change it toerror_reporting = E_ALL & ~E_NOTICE & ~E_STRICT & ~E_DEPRECATED & ~E_WARNING - Now search for
max_execution_time. Change it tomax_execution_time = 1200 - Open the php.ini file inside the C:\wamp64\bin\php\php8.2.13\php.ini and do these same edits there as well
- When the file opens search for
2.2 MYSQL Setup
-
Fixing the MySQL mode
-
Click on WampServer icon -> MySQL -> my.ini
-
When the file opens, search for
sql_modeif it is already set comment out that line by adding a semi-colon;in the beginning of the line and add the following lines after that:sql_mode = innodb_strict_mode = 0 -
Search for
innodb_default_row_format=compactand change it toinnodb_default_row_format=dynamic -
If it is not there then just add
innodb_default_row_format=dynamic -
Close the text file
-
-
Next we will change MySQL password.
-
WampServer icon -> MySQL -> MySQL Console
-
Username is
root -
Password is blank (just press enter when it asks for password)
-
Now type this:
ALTER USER 'root'@'localhost' IDENTIFIED WITH mysql_native_password BY 'PASSWORD'; FLUSH PRIVILEGES; exit; -
Press enter after pasting these lines in the terminal
-
-
Click on Wampserver icon and Restart all services
-
Download latest version of composer from https://getcomposer.org/download/
3. Setting up VLSM
3.1 VLSM Application Setup
- Download VLSM from https://github.com/deforay/vlsm
- Unzip and put it in
C:\wamp\www\vlsmorC:\wamp64\www\vlsmpath - Put the composer.phar also inside the vlsm folder
- To complete VLSM installation, open the terminal and run the composer commands
cd C:\wamp64\www\vlsm

set PATH=C:\wamp64\bin\php\php8.2.13;%PATH%

php composer.phar install --no-dev
php composer.phar dump-autoload -o
- The latest VLSM database is inside the vlsm/sql/init.sql file.
- Start phpmyadmin by typing http://localhost/phpmyadmin in browser (login id is
rootand password ismko)(*&^) - Click on
SQLmenu on top and type the following lineCREATE DATABASE `vlsm` CHARACTER SET utf8mb4 COLLATE utf8mb4_general_ci; - This will create a blank vlsm database. Now click on vlsm on left and import the sql file downloaded earlier
- Also run the SQL commands from this link https://github.com/deforay/vlsm/blob/master/sql/audit-triggers.sql
- Rename the file configs/config.production.dist.php to configs/config.production.php
- Enter Database User, Password, DB Name etc.
// VLSTS URL
$systemConfig['remoteURL'] = 'https://STSURL';


// Enable/Disable Modules
// true => Enabled
// false => Disabled
$systemConfig['modules']['vl'] = false;
$systemConfig['modules']['eid'] = true;
$systemConfig['modules']['covid19'] = false;
$systemConfig['modules']['hepatitis'] = false;
$systemConfig['modules']['tb'] = false;

// Database Settings
$systemConfig['database']['host']       = 'localhost';
$systemConfig['database']['username']   = 'root';
$systemConfig['database']['password']   = 'PASSWORD';
$systemConfig['database']['db']         = 'vlsm';
$systemConfig['database']['port']       = 3306;
$systemConfig['database']['charset']    = 'utf8mb4';

.
.
.
.
.


// Enable/Disable Interfacing
// true => Enabled
// false => Disabled
$systemConfig['interfacing']['enabled'] = true;

// Interfacing Database Details (not needed if above feature set to false)
$systemConfig['interfacing']['database']['host'] = 'localhost';
$systemConfig['interfacing']['database']['username'] = 'root';
$systemConfig['interfacing']['database']['password'] = 'PASSWORD';
$systemConfig['interfacing']['database']['db'] = 'interfacing';
$systemConfig['interfacing']['database']['port'] = 3306;
$systemConfig['interfacing']['database']['charset'] = 'utf8mb4';
-
Next step is creating a virtual host pointing to the vlsm application
-
Start notepad or notepad++ as admin user (go to start menu, search for notepad and right click and click on Run as administrator)
-
open this file
C:\windows\system32\drivers\etc\hosts -
Add this line at the bottom
127.0.0.1 vlsmand save & close the file -
Next open
C:\wamp\bin\apache\apache2.4.54.2\conf\extra\httpd-vhosts.conf -
change the existing vhost to the following:
<VirtualHost *:80> ServerName localhost ServerAlias vlsm DocumentRoot "${INSTALL_DIR}/www/vlsm/public" <Directory "${INSTALL_DIR}/www/vlsm/public/"> AddDefaultCharset UTF-8 Options +Indexes +Includes +FollowSymLinks +MultiViews AllowOverride All Require local </Directory> </VirtualHost> -
Save & Close this file
-
Click on WampServer icon and Restart all services
-
-
Now go the command prompt and type these commands:
cd C:\wamp64\www\vlsm set PATH=C:\wamp64\bin\php\php8.2.13;%PATH% php composer.phar post-install -
Now open http://vlsm
- Register a new Admin user and Login
- Fill the instance details in the popup. Select BOTH for type of Instance
- Now scroll to the bottom and click on
Force Remote Sync. Please wait for the sync to finish.
-
Once sync is finished go to http://vlsm/system-admin
- Secret Key can be found in
C:\wamp64\www\vlsm\app\system-admin\secretKey.txt - Register new System Admin and Login
- Select Instance Type as 'Lab Instance' and then select the Lab name from dropdown and click on Submit. (Ignore SMTP settings)
- You can sign out
- Secret Key can be found in
-
Users can now start using vlsm from http://vlsm URL
3.2 Task Scheduler
- Run Task Scheduler. Click on "Create Task"
- Name : VLSM TASK
- Select "Run whether user is logged on or not"
- Now Go to the ‘Triggers’ tab which is next to the ‘General’ tab. And Click on the ‘New’ button.
- Select 'Daily'
- Check "Repeat Task Every" and make it as "1 minutes" and choose for a duration of "Indefnitely"
- Check the checkbox ‘Stop the task if it runs longer than’. It is optional. If the script goes in an indefinite loop or a similar situation due to any reason, the task will be terminated automatically after the day/time defined in this option. By default the value is ‘3 days’. Leave the default value.
- Click OK
- Click on the ‘Actions’ tab and click on the ‘New’ button inside it.
- in the Program/Script find the php exe file for eg.
C:\wamp\bin\php\php8.2.13\php.exeorC:\wamp64\bin\php\php8.2.13\php.exe - in Add Arguments type
C:\wamp\www\vlsm\vendor\bin\crunz schedule:runorC:\wamp64\www\vlsm\vendor\bin\crunz schedule:run - Click on OK
- When prompted for password, please enter the Windows user password (might be cphd123, but check with lab first)
4. Setting up Interfacing
- Start phpmyadmin by typing http://localhost/phpmyadmin in browser (login id is
rootand password ismko)(*&^)
Updating VLSM on a Windows Machine
0. Backup
- Start phpmyadmin by typing http://localhost/phpmyadmin in browser
- Go to
vlsmdatabase and underExporttab, click onCustom - display all possible options - Under Output: section select
Zippedcompression and then scroll to the bottom and click onExportbutton - Once the file is downloaded, keep it safely
1. Download VLSM
- Download VLSM from https://github.com/deforay/vlsm
- Unzip the VLSM folder and copy all contents to the
C:\wamp64\www\vlsmfolder - DON'T DELETE THE EXISTING VLSM FOLDER, JUST COPY FILES INTO IT
2. Completing the Update
- To complete VLSM update, open the terminal and run the composer commands
cd C:\wamp64\www\vlsm

set PATH=C:\wamp64\bin\php\php8.2.13;%PATH%

php composer.phar install --no-dev
php composer.phar dump-autoload -o

php composer.phar post-update
- Now open http://vlsm and check if everything is okay
Migrating From one Ubuntu machine to another
BACKUP DATABASE ON OLD SYSTEM FIRST
Go to terminal
cd ~;

sudo -s;

wget -O db-backup.sh https://raw.githubusercontent.com/deforay/intelis/master/scripts/db-backup.sh

sudo chmod u+x db-backup.sh;

sudo ./db-backup.sh;
- Enter the MySQL Username, Password when prompted
- Choose the database(s) you want to export
- Wait for the script to finish running
- Copy the db file(s) to a flash disk or CD.
RESTORE DATABASE AND INSTALL VLSM ON NEW SYSTEM
Ensure new system is Ubuntu 22.04 or above (ONLY LTS)
Copy the backed up file from flash disk or CD to the Desktop folder of the new computer
then in the terminal run the following commands one by one.
cd ~/Desktop;

sudo -s;

rm -f *.sql

gzip -d vlsm-*.sql.gz && mv vlsm-*.sql vlsm.sql

wget -O setup.sh https://raw.githubusercontent.com/deforay/intelis/master/scripts/setup.sh

chmod +x setup.sh;

./setup.sh  --db  vlsm.sql

rm setup.sh;

exit; exit;
Enter the mysql password and STS URL correctly when prompted.
VLSM Setup
- Now edit config.production.php and enter correct MySQL details and other config
sudo gedit /var/www/vlsm/configs/config.production.php - Now open http://vlsm/
- Register new admin
- After successful registration login as admin http://vlsm/
- After you login, Fill the instance details in the popup. Select LIS with Remote Ordering Enabled
- Select the lab from the dropdown
- Click on Force Sync and wait for sync to finish
Fix Illegal/Mismatched Collation Issue
-
Log in to phpMyAdmin
- Open your web browser and navigate to your phpMyAdmin URL.
- Enter your username and password to log in.
-
Select the VLSM database
- On the left-hand side of the phpMyAdmin interface, locate and click on the vlsm database.
-
Go to the "Operations" tab
- Click on the "Operations" tab at the top of the page.
-
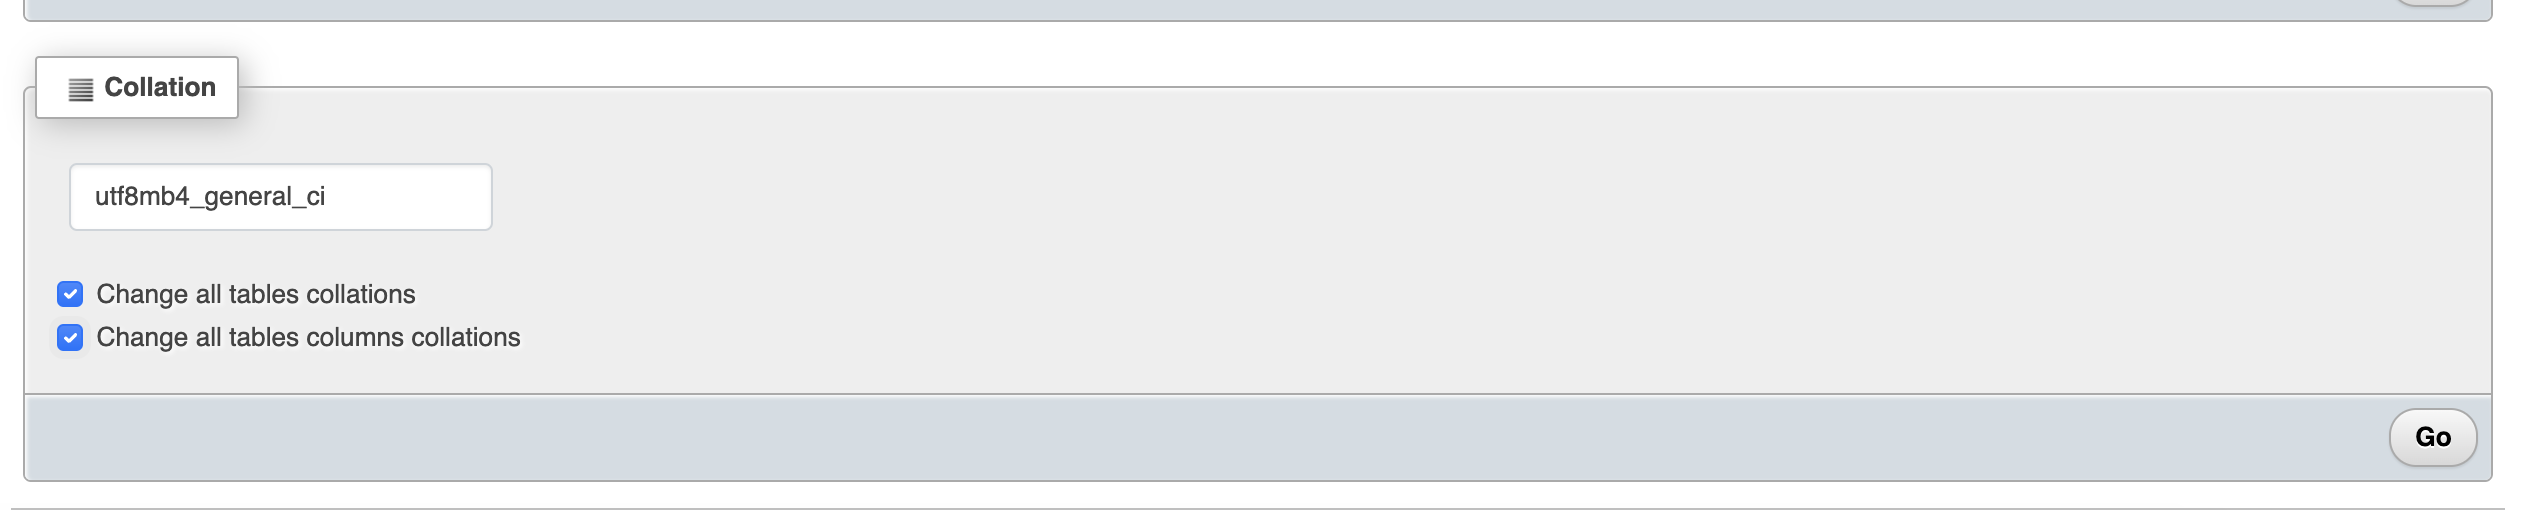
Locate the "Collation" section
- Scroll down to the "Collation" section on the "Operations" page.
-
Select the desired collation
- In the "Collation" dropdown menu, choose the
utf8mb4_general_cicollation.
- In the "Collation" dropdown menu, choose the
-
Check the options to change collation
- Check the checkbox next to "Change all tables collations" to apply the selected collation to all tables in the database.
- Check the checkbox next to "Change all tables columns collations" to apply the selected collation to all columns within all tables in the database.
-
Apply the changes
- Click the "Go" button to execute the collation change for all tables and columns in the database.
-
Wait for the process to complete
- phpMyAdmin will now apply the selected collation to all tables and columns in the database.
- Wait for the process to finish. The time taken may vary depending on the size of the database.
Backing up to Google Drive with Rclone on Ubuntu
1. Install Rclone
-
Open a terminal on your Ubuntu machine.
-
Run the following command to install Rclone:
sudo apt install rclone
2. Configure Rclone
-
In the terminal, run the following command to start the Rclone configuration:
rclone config -
Choose "n" for a new remote and press Enter.
-
Enter a name for your remote (e.g., "gdrive") and press Enter.
-
Select "drive" as the storage type for Google Drive and press Enter.
-
Press Enter to use the default client ID and client secret.
-
Leave the scope as default and press Enter.
-
Select "1" for "Full access to all files" and press Enter.
-
Leave the "root_folder_id" and "service_account_file" empty by pressing Enter.
-
Select "n" for no advanced config and press Enter.
-
Choose "n" for no auto config and press Enter.
-
A URL will be provided. Open it in a web browser, log in to your Google account, and grant permissions to Rclone.
-
Copy the authorization code, paste it into the terminal, and press Enter.
-
Choose "n" for no team drive and press Enter.
-
Verify that the configuration looks correct and choose "y" to save it.
3. Create a backup script
-
Open a text editor (e.g., nano) to create a backup script:
nano /var/www/backup.sh -
Copy and paste the following content into the script (MAKE SURE TO CHANGE LABNAME):
#!/bin/bash source_dir="/var/www/vlsm" remote_name="gdrive" remote_dir="LABNAME" rclone sync "$source_dir" "$remote_name:$remote_dir" -
Modify the
source_dir,remote_name, andremote_dirvariables according to your setup. -
Save the script and exit the text editor (Ctrl+X, then Y, then Enter in nano).
4. Make the script executable
-
Run the following command to make the script executable:
chmod +x /var/www/backup.sh
5. Run the backup script
-
Execute the backup script by running:
/var/www/backup.sh -
Rclone will start syncing the
/var/www/vlsmfolder to your Google Drive.
6. Automate backups
- Run the following commands to automate the backups:
(crontab -l 2>/dev/null | grep -q "@reboot /var/www/backup.sh" || echo "@reboot /var/www/backup.sh") | crontab -
(crontab -l 2>/dev/null | grep -q "0 */6 * * * /var/www/backup.sh" || echo "0 */6 * * * /var/www/backup.sh") | crontab -
That's it! You have now set up Rclone on your Ubuntu machine and created a script to backup the /var/www/vlsm folder to Google Drive. The backup will run automatically based on the schedule you specified in the cron job.
Setting up Interfacing Tool on a client Ubuntu Machine
On the Client Ubuntu Machine :
sudo apt-get update && sudo apt-get upgrade -y;

sudo apt-get install mysql-client;
On the Server Ubuntu Machine :
sudo gedit /etc/mysql/mysql.conf.d/mysqld.cnf
In this file change the bind-address and mysqlx-bind-address to 0.0.0.0
bind-address		= 0.0.0.0
mysqlx-bind-address	 = 0.0.0.0
and allow 3306 port via firefall and restart mysql
sudo ufw allow 3306/tcp
sudo service mysql restart
Open phpMyAdmin on the server machine and run these SQL Queries
USE mysql;

CREATE USER 'interfaceadmin'@'%' IDENTIFIED BY 'interface@12345';

ALTER USER 'interfaceadmin'@'%' IDENTIFIED WITH mysql_native_password BY 'interface@12345';

GRANT ALL PRIVILEGES ON interfacing.* TO 'interfaceadmin'@'%';

FLUSH PRIVILEGES;
Now you can use this new user in the interface tool
Permission Denied Issue
Open the terminal and run the following command
sudo setfacl -R -m u:$USER:rwx,u:www-data:rwx /var/www;
Backing up LIS or STS to a remote Backup server
Follow these steps to set up automatic backups to a remote Ubuntu machine:
Step 1: Download the Script
Open a terminal on your Ubuntu machine and run the following command to download the backup setup script:
cd ~
wget -O remote-backup.sh https://raw.githubusercontent.com/deforay/vlsm/master/scripts/remote-backup.sh
Step 2: Make the Script Executable
To allow the script to run, change its permissions using the following command:
sudo chmod u+x remote-backup.sh
Step 3: Run the Script
Execute the script with superuser privileges to begin the setup process:
sudo ./remote-backup.sh
What the Script Does:
-
Prompts for the Instance Name:
- Enter a unique name for your lab or instance (e.g.,
lab1,centerA). - The script will sanitize the name to ensure compatibility.
- Enter a unique name for your lab or instance (e.g.,
-
Installs Required Tools:
- Ensures
rsyncis installed on your machine.
- Ensures
-
Generates SSH Key:
- Creates an SSH key for secure communication with the backup server (if not already present).
-
Prompts for Backup Server Details:
- Enter the username and IP address or hostname of the backup server.
-
Verifies Connectivity:
- Tests the connection to the backup server.
- If the connection fails, it will prompt you to re-enter the credentials until the connection succeeds.
-
Copies SSH Key:
- Automatically transfers the SSH key to the backup server to enable passwordless communication.
-
Creates Backup Script:
- Sets up a script to back up
/var/www/vlsmto the backup server.
- Sets up a script to back up
-
Schedules Backups:
- Configures automatic backups to run every 6 hours and on reboot using cron jobs.